Monday, January 3, 2011

Winter Tag and New Images

Good evening. I hope you had a wonderful Christmas and a great New Year celebration. We spent Christmas at my daughter's, and we spent New Years there playing with the grandkid's Wii.  I think my hubby may be contemplating getting one.

I loved seeing Tim Holtz's Christmas tags. Alas, I don't have access to all his stamps and supplies, but using what I already have, I made this:


I stippled the tag with a couple different colors of blue.  I stamped the trees with black ink but didn't like how it turned out, so I overstamped them with green ink.  I think they turned out okay.  I used a swirl stamp to put a few swirls on the tag just to take up the open space.  I have a stamp that I love that is very similar to one of Tim's that is soooo versatile.  It's the Spatter Background Stamp and it looks like this:
You can use it for snow (like I did), or to add texture to a background. I've used it for rain and sand, and you are only limited by your imagination.

I punched some snowflakes and added glitter glue to give them sparkle.  I love snowflakes and love to make winter cards using them.  We don't have real snowflakes in Florida...lol.

And for the bottom I ran a piece of blue cardstock through the cuttlebug with an embossing folder, then ran my dark blue inkpad over the piece to darken the raised pieces.  I tore the bottom for added interest.

I stamped the "dream" stamp onto cream cardstock, tore it out and aged the edges with a dark brown ink.

I enjoyed making the tag, and I was pleased with the way it turned out.

And now, since we are in a new year, I wanted to introduce some new stamps.
There are 16 individual silhouette stamps. These stamps are approximately 1-1/2 x 2 inches each and are $3.50 each. You can see them by going to My Paper Moon and click on What's New. To celebrate this new release, I will be selling them for 10% off for a short time.

Hope you have a great week!

Tuesday, December 21, 2010

Tuesday Tip Day - Versamark Pads

Good morning. Only a few more days until Christmas.  Have you gotten all your shopping done? I think I am as ready as I'll ever be. At least I hope so.  I'll probably still be remembering things I should have gotten or should have done, right up until Christmas.

I'm making some new goodies to eat this year, and if they turn out okay, I'll share the recipes with you here.

Now on to today's tips:  Using your Versamark Pads
  • Use for adding discreet journaling lines to your scrapbooking.  The Versamark ink is sticky when you first apply it, but it dries like regular ink and loses it's stickiness. It's acid-free so it's safe for your scrapbook pages, and it works on all colored card stock.
  • Use it in place of embossing ink.  Just stamp and emboss with colored or clear embossing powder.
  • Use it for shadowing. This is a technique that works well with kaleidacolor pads and word stamps, but actually any type ink or stamp will work. Stamp the image with Versamark. Then stamp directly over it with your other colored ink. Because you seldom will be exact in the placement of the second stamping, you will make a shadow that gives a 3-D effect.  You can embellish on this by embossing with a transparent embossing powder. Metallic ink pads also give a stunning effect.
  • You can use your Versamark pad to make a watermark.  This is great for tone on tone backgrounds. It will deepen the shade of colored paper wherever you stamp.  So, for every color of paper you own, you now have a complementary color of ink. 
  • You can do the Poppin' Pastels technique. There are two ways to accomplish this effect on light colored card stock.
    • Apply chalks to the area to be stamped, then stamp with Versamark and allow to dry (or use your heat tool to dry your paper faster). Then gently rub with a clean cotton ball.  You could emboss with clear embossing powder while the stamped image is still wet, and the image will jump out at you.
    • Stamp first with Versamark, then rub the chalk gently over the stamped area and watch the image magically appear.
  • You can do the Reverse Pastels technique. This time you will use brightly colored chalk to cover dark card stock. Then stamp with Versamark over the chalked area.  The ink will pull out the color of the paper from beneath the chalk. I like to emboss with clear embossing powder while the ink is still wet.  Be sure to clean your stamp before re-inking it, as the chalk you removed is now on the stamp, and you will dirty your Versamark pad.
  • The Brayer Resist technique can be done with Versamark.  Stamp your image(s) onto glossy white card stock, using Versamark ink. Gently wipe away the ink using a lotion free tissue, wiping in a small circular motion. Ink up your brayer and roll it over the paper. Wherever the Versamark was stamped, the paper will resist the colored ink from your brayer. 
  • Embossing on Glass - Use an anti-static bag on your glass to remove any static electricity. Use the Versamark to stamp an image onto a glass container. Emboss with detail gold or silver embossing powder. Fill your glass container with candy and tie a ribbon on it. Makes a great gift for a hostess.
I hope you get to try some of these tips. Leave a comment and tell us how it worked out for you, or, if you have other tips for using a Versamark pad, please share them with us.

I hope you have a very merry Christmas!

Tuesday, December 14, 2010

Tuesday Tip Day - More Fiber Fun

WOW!! Less than 2 weeks til Christmas.  The time has snuck up on me, and I'm not ready.  Are you ready?  I did manage to get all my Christmas cards done, but I haven't finished my Christmas shopping.  Yikes, I'd better get a move on.

This blog is posted several different places, so not all the comments show up here. It's also linked to my Facebook page, and of course, the comments there don't show up here.  If you want to friend me on Facebook, please make sure you put blog in the comment section so I'll know where you found me.

Now, let's get some more fiber tips!  Some of these may also be used for scrapbooking. I like that you can use fibers in multiple places.

You can use fibers to:

  • Map out your vacation route with fiber threaded through eyelets (great scrapbook page)
  • Spell out the greeting, using fibers to stitch out the letters
  • Make a frame around a stamped image.
  • Use as laces on paper pieced shoes (great for paper pieced sneakers)
  • Use fibers to tie 2 or more elements together
  • Scarf on a stamped or paper pieced snowman
  • Create bows
  • Fringe on animals
  • Build a water/mountain outline
  • Attach a tail to a kit
  • Use for seaweed
  • Make clotheslines for hanging small clothes with tiny pins.
  • Stitching a template design
  • To hang or attach buttons or charms
  • Use to hang signs from buttons, brads or eyelets
Can you think of other uses for fibers?  Please leave a comment and let us know.

I don't know if I will get to post again before Christmas, but I'll try.  If not, have a great Christmas.

Hugs,

Tuesday, November 30, 2010

Tuesday Tip Day

Good morning!  It's been awhile since I've posted, I know, but life has been busy.

Thanksgiving was a great success this year.  We didn't cook, we went out to a restaurant with a Thanksgiving buffet and enjoyed our meal immensely. Scott roasted a small turkey breast so we would have "leftovers" for sandwiches, and I bought a couple of pies, and we were good to go. And the best part was, we didn't have to spend 2 days cooking and all the mess to be cleaned up.  And we had turkey, ham, prime rib and baked stuffed sole, so the family members who really don't care for turkey were in heaven. Hope yours was fantastic, too.

I thought today I would give you some tips for using those fibers that you have left over from when fibers were all the rage. If you are like me, you still have lots left. Let's use them up.  Here are some ways to do that:

  • Weave through mesh
  • Create trees or grass
  • Make hair or other features on paper dolls
  • Use as a string for balloon diecuts or stamped balloons
  • Tie through the hole on a tag
  • Create a spider web
  • Use as decorations on a Christmas tree
  • Use as decorations on an Easter Egg
  • Use as a blanket stitch around a border or mat
  • Make tassels
  • As needlepoint stitches on your page or card
  • As an enhancement to die cuts
  • Use to hang mini tags
  • Use as an accent on Serendipity Squares
  • As embroidery stitching
  • Attach to a brad and use as a yoyo
  • Use for wrapping presents
  • Wind fibers tightly together to form the center of a flower
Can you think of other uses for fibers?  Please add a comment. We will keep adding to the list.

Have a great week and I hope you get to do something crafty.

Wednesday, November 10, 2010

Autumn Cards

Good evening.  It's been a while since I last posted, and tonight seemed like a good time to rectify that.  Since that time Halloween has come and gone (both granddaughters had strep throat and didn't get to go trick or treating), I've participated in a virtual stamp convention over at Rubber Stamp Chat, we've had an election, and I'm finally settling back into the routine.

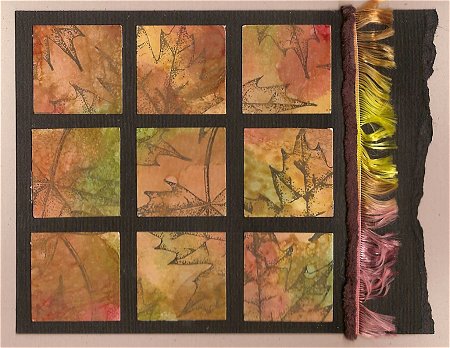
I have made a couple of autumn cards, so I'll share those with you:


Both of these cards use a leaf set from The Angel Company, which is my favorite autumn stamp. I have had this set for 5 or 6 years, so I'm not even sure if they are still available.  I used alcohol ink for the colored background, then stamped my favorite leaf stamp.  On the first card I just cut the stamped background into squares and put them on the card. I used some fibers I've had for some time.  (Just trying to get rid of stuff).

On the 2nd card I made the background the same way, colored it with alcohol ink, then stamped the leaf.  I punched this set out with a scalloped punch, and tied raffia around the background.

I hope you have a great week, and I hope you get to do something crafty.

Inky hugs,

Thursday, October 28, 2010

Layout Challenge

Good evening.  I have a busy, busy weekend ahead, how about you?  I am in the middle of a virtual stamp convention at Rubber Stamp Chat, so I have orders to make.  Also, I need to get a haircut, I want to carve pumpkins with the granddaughters, and Sunday is Halloween, so I'll have to help the oldest granddaughter with her makeup.  She wanted to be the Mad Hatter, so we got her costume all ready, but she'll need help with the makeup.  The youngest one is going as a hippie, and she really looks cute in her costume.

I want to post some cards I made for the Technique Junkies layout challenge.  I had a lot of fun, and even though all the cards are the same layout, they have different looks. Tell me what you think:


They are pretty self-explanatory, so I won't bore you with all the details.  Why don't you give this layout a try?

Oh, I want to make some Pizza Mummies for the girls when they are here.  They are easy to make...just take English Muffin, split and toast.  Put some pizza sauce on them, then cut the cheese into strips. Layer the cheese in a criss cross fashion, leaving space for the eyes.  For the eyes, use black olives, and put either a piece of pimiento or scallion for the pupil. Place in a 350 degree oven until the cheese is lightly melted (about 10 minutes).   You can see them here.Publish Post

Hope you have a great weekend....

Sunday, October 10, 2010

Pink and Brown Distressed Card

Good morning!  It's a beautiful morning here in Florida. I have been sleeping with my windows open and really enjoying the cool air.

A friend recently had surgery and I wanted to make her a special card while she recuperated.  I know she likes pink, so that was a must.  I had just gotten a Technique Junkie newsletter, and there were a couple of designs in there I liked, so I combined the techniques and morphed it into this card:

I used glossy cardstock and liberally smooshed a light brown ink on it.  I put the top half in an embossing folder and spritzed it with water before I embossed.  I repeated with the bottom half in a different embossing folder.  While it was wet I blotted some of the pooled ink.  When the piece dried it was much lighter and looked kind of highlighted.

I used the same brown ink on a piece of regular white cardstock. Then I stamped "Thinking of You". You can see how much darker it stayed when it was dry. (I didn't spritz it with water). I used a corner rounder then layered it on pink cardstock and rounded those corners as well.

I layered ribbon between the two embossed halves.  Then I punched a bunch of flowers from different sizes of punches out of patterned paper, then put them together with a brad and placed on the ribbon.

The whole thing is very distressed looking, so if you like that look, this is a great way to achieve it.  I really liked the card when I was finished, and I hope it brightened my friends' day when she received it.

Enjoy the autumn weather....