Good morning and welcome to another Over the Moon Monday. Did you have a good week? The weekend was great...too short, but great. I am having computer issues, and it's driving me nuts. For the last year I have used both McAfee Virus Scan and Webroot Spysweeper together with no problems. I had to renew my McAfee and now I learn they are not compatible, so I have to decide which one to use. I like them both. If you have any experience with either one, please email me or leave me a comment on why you like it.
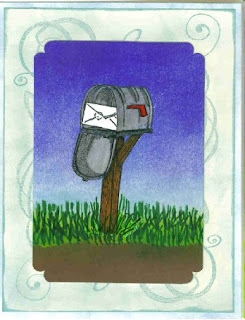
Today I want to give you some tips on sponging. It's a very simple technique, but can give you lots of interesting results. In the card sample below, I have used a couple of different sponging techniques.
 I sponged a light blue onto the background cardstock (with the swirls). I sponged the sky and also the grass. I used a green marker to draw in the distinct blades of grass.
Types of sponges:
- cosmetic/facial sponges
- porous everyday sponges
- natural sponges
- bathtoy sponges
Methods of use:
- cut or tear sponges to get different textures.
- use sponges either dry or slightly dampened with water.
- use different amounts of pressure to get darker or lighter effects
- tapping, smudging, smearing and circular motions are all ways to get different effects and textures.
Stamping tips:
- sponge around paper masks which you have cut or torn to create cloud-filled vistas. Then sponge on a bit of light blue, pink or violet to accent clouds.
- sponge through paper doilies, lace, or netting for a delicate Victorial look. You can also make borders using sponging and masks.
- for beautiful grass, sponge on shadings to lay down base colors of greens, blues and yellows. Then use a grass stamp for distinct blades (or use a marker to make blades). Stamp it over and over without re-inking to add depth.
- sponge over nautical designs to give them the impression of being under water, in fog, etc.
- use the full width of the sponge for large areas or backgrounds or cut your sponge into your own design, such as a star or heart. For example, you can create a brick wall by using a small rectangular piece of dry sponge.
- use your sponges slightly damp instead of dry, for a softer, more blended look.
I hope you can use some of these tips. You can leave a link under the comment section on this blog.
Have a great week!

No comments:
Post a Comment