Monday, February 22, 2010

Over The Moon Monday - Pick 3 Challenge

Good morning and welcome to another Over The Moon Monday.  I hope the weather has been good where you are.  It's been cold here in Florida (not that I'm complaining...it's better than being too hot), but Sunday was a lovely day.  A true spring day, with birds singing.  I sat outside and read part of the day and really enjoyed it.  Maybe spring is finally on it's way. 

I haven't had a Pick 3 Challenge lately, and Ithink it's time to have another one, how about you?  So without further ado, let's get started.

If you haven't participated in a Pick 3 Challenge before, this is how it works:  I will pick 6 things.  You have to make a card or project using 3 of the 6 things I have chosen.  Then post a link to your work here at the website, in the comments section. It's pretty easy.

Here are the list of 6 things to choose from:

  1. Birds

  2. Jewels

  3. Blue

  4. Faux Stitching

  5. Dry Embossing

  6. Birthday


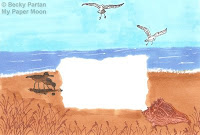
    For the challenge I made the following thank you card.  This is not a standard A2 card, but is about 3-1/2 x 3-1/2.


    I love this little bird stamp from My Paper Moon. 


    • I cut the 6 panels using a Provo Craft die.  I embossed 2 with the Cuttlebug Dotted Swiss Embossing Folder.  To hightlight the dots, I ran a darker blue dye inkpad over the raised area. 

    • Two of the panels I cprayed with a gold mist spray. These were all cut from a left over piece of cardstock.

    • I stamped the birds onto a piece of beige cardstock, then colored with Copic markers. 

    • To make the foam of the seashore, I used a white Gelly Roll pen. I added a little glitter with a glitter pen to the sea, making it look like the sun glinting off the waves. 

    • I cut this out using a nestability die, then mounted onto beige cardstock that was cut a little largerl\

    • I stamped the "thank you" (The Angel Company) onto beige cardstock that I colored with Copic markers and cut out with the Provo Craft die.  I mounted this onto  a larger piece of cardstock (again fromt he scrap cardstock I used before) that was also cut with a Provo Craft die.

    • I stamped a faux zig zag stitch onto blue cardstock and mounted the thank you on it, then adhered to the card.
    To mail the card, I am using a standard A2 envelope, since postage would be more for a square envelope, and I'm trying to be thrifty.  Here is the envelope I made:
    Let's see what you have made.  Leave a link in the comment section to your creation.

    While I had that little sandpiper stamp out, I made another card. I cut a larger piece of cardstock with the nestability die for this one, and I used the faux flower soft (I don't know the name, but I think it's called fluff or something) for where the wave is breaking on the shore.  It's made from styrofoam, and I made a bunch. I put it in little baggies and colored it with reinkers. I've never used the real Flower Soft, but this is an economical substitute, and I love the way it looks.

    The background swirl stamps are from The Angel Company.

    I hope you have a wonderful week, and that you get to do something crafty.  See you again next time.


    Monday, February 15, 2010

    Over The Moon Monday - OWOH Winners and Envelope Art

    Good morning and welcome to another Over The Moon Monday. Lots to get done today, so let's get to it.

    I had so many people visit my blog for the One World One Heart event.  Over 500 people visited, with 189 leaving comments.  Wow!  I was overwhelmed with the response.  So, instead of having a drawing for one stamp, I decided to give away 2 of the heart stamps.  My granddaughters literally pulled the winning entries out of a box, so without further ado, let me announce the winners.  Drum roll please....and the winners are..Brenda Lee and D Schrader.  Congratulations to both of you.  Both ladies have been notified, and I'm awaiting their mailing address to get their prize in the mail. Thank you to everyone who visited my blog during this event, and to those of you who left comments. I hope to see you again soon.  And now, on with the show.....

    Do you send out naked envelopes?  It always makes my day when I receive a card with an envelope that's all decked out.  And it's easy to do.  You can use random stamps to stamp a collage on your envelope, or you can keep it with the theme of your card.

    This envelope was used to mail out my February ATC for a swap I'm in.  I chose to use the Valentine theme for the envelope (it's also the heart stamp for the OWOH giveaway). I used some drywall tape to make the colored corners.  I just plopped it down on the envelope, then sponged some red ink on it, then removed it from the envelope.  Here's a quick tip:  if the tape is too sticky, stick it on your clothes and remove it a couple of times to reduce the tackiness.  You can use this tip for any tape.

    Here is another envelope I decorated.  I think it will be good for mailing something for spring in.  I stamped the flowers  and dragonflies with their respective colors of ink, then used glitter glue to go over them to give them a wonderful sparkle.  Can you imaging how much joy you will give the postal workers who handle this mail, all the way from your post office to the recipient's postal carrier, and then the recipient of your piece of mail will get to enjoy it too.

    Here is my final piece of envelope art for today.  I made this envelope to mail my sister's birthday card in.  I think she'll like it. She keeps everything I send her, so I'm sure this envelope will end up in her collection, too. The only think I added glitter to was the sun, and he's really sparkly.  I used Twinkling H2O's directly on the flower stamp, so they have a sheen to them. The grass I drew in freehand with a green marker.

    I hope you have enjoyed the envelope art today, and you will decorate your envelopes in the future.  Let's stamp out naked envelopes.

    Please share any links you have to your own mail art in the comment section below. (If you are reading this from a site other than the blog, you need to visit the blog to leave comments).

    Have a crafty week...

    Friday, February 5, 2010

    One World - One Heart (OWOH) My Paper Moon Giveaway

    Photo


    Hello and welcome to my blog. This is my first year participating in this event which was created by Lisa of A Whimsical Bohemian.  Make sure that after leaving a comment here you go visit her blog for lots more links to great blogs (over 900 of them) and giveaways.   I want to thank Marina of Cherry Pie Art Stamps for telling me about this event.

    This is a great opportunity to meet new friends, and so I'd like to tell you a little about myself.  I live in Florida and I am married to a wonderful man. Between us we have 4 children, 2 grandchildren, 2 cats, various grandpets, and a love for rubber stamping.  I own My Paper Moon, which is a rubber stamp manufacturing company. You can see more posts of what I love to do if you read further. Please leave me a comment and tell me a little about yourself.

    Just for stopping by I would like to give you the opportunity to win one of my unmounted rubber stamps. I think it's fitting that it be a heart stamp, don't you?


    You have to leave a comment and a way for me to contact you if you win. The cutoff time for leaving a comment is February 13th, so please get your comment posted by then. I will be using a random number generator to pick the winner, which I will be announcing right here on February 15th.  If you are reading this at a site other than the blog, you have to come here (http://www.becky-mypapermoon.blogspot.com/)  to leave a comment.

    I'm glad you stopped by and I hope to see you here again.

    Monday, February 1, 2010

    Over The Moon Monday - Cool Cat


    Good morning and welcome to another Over The Moon Monday.

    I hope you have had a great week, and you didn't get too much snow where you live.

    Today I want to use one of my favorite stamps to make another Valentine. This stamp (Cool cat - #02-134I) is very versatile, and I have a number of sayings that fit into the heart. He can be paper pieced very easily, also.

    I have returned to making simple cards. Mainly because I donate a lot of my cards to various causes (supporting the troops and helping special needs individuals), it is easier for them to mail flat cards. So, with that being said, let's get to today's card.

    I used the black dotted paper to make the card background. I stamped a piece of red cardstock with a lip stamp, using versamark, so it came out like a watermark (although you can't see it in the scan). Then I tore it and attached it to the background.

    I used a nestability die to cut out some white cardstock, then stamped the cool cat in the middle. I colored him with copic markers. I stamped again onto the black dotted paper and cut out the heart, which I attached to the cat. The cat is made so that he's easily cut out, and you could use pop dots to put him onto the background and give him some dimension.

    I attached the whole thing to the background. I stamped "I love you" onto white cardstock, then used a red marker to faux stitch the top and bottom. I attached this to the bottom of the card. I stamped a sentiment in the inside and I was done.

    I hope you have a great week.