Tuesday, August 14, 2018

Cell Phone Stands

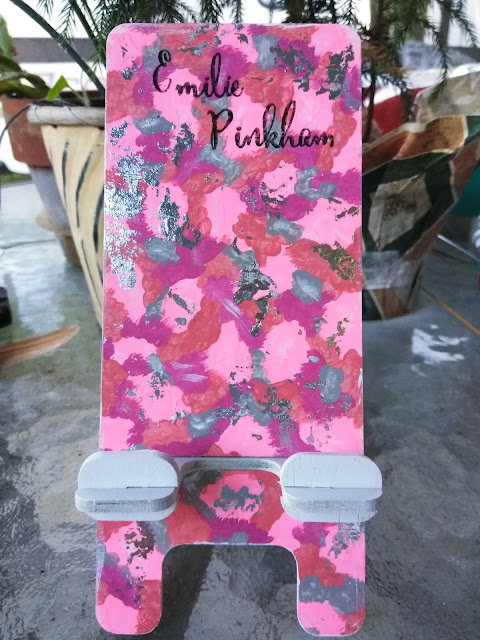
Good afternoon.  A couple of weeks ago I was on the Deco Art Facebook page and an artist had made some beautiful cell phone stands.  So, I inquired where to get the blanks, and ordered a few to make for my girls for Christmas.  I will put the link here, but they are now more than double what I paid for mine...just so you know.  Creative Arts Lifestyle 
 

So, they came, and I got out the acrylic paints, some stamps, and some ink.  I painted mine so they are double sided...gives you two surfaces you can interchange. 


My granddaughter likes camo and cats, so that was easy.  I chose 3 pinks, a gray, and some silver foil and made some camo.  I stamped her name using a Stampin' Up alphabet and Gina K Amalgam ink. I love this ink and used it on all the images.  When dry, it doesn't smear or bleed, so it's great for coloring with alcohol ink markers or watercoloring.  It's my new go-to ink.


For the other side, I painted bright colors and stamped one of the Tim Holtz Crazy Cats along with the fish bones, milk and ball of yarn.  I used a stamp positioner to stamp the images, then I painted them with acrylic ink, then stamped them again to make them pop.  

The white part can be removed and the back turned around, which is why I left it white.

For the next holder, I used a Stampin' Up mermaid stamp and free-handed the fish and kelp.  Again, I used a stamp positioner to stamp the mermaid, painted her with acrylic paint, then stamped her again, for a crisp image.


There is glitter on the mermaid tail, and glitter on the bubbles.

The other side of the holder I painted white, then stamped the flowers (Gina K, I think), dragonfly (Stampin' Up), and leaves (Ranger Dylusions).


I painted the images with acrylic paint and then stamped again when it was dry. I put glitter on the dragonfly for some sparkle.

I'm not a great artist, but I am happy with the way they turned out.  I have a couple more to make and will share them at a later date.

Hope you are staying cool.  It's still hot as blazes here.  I am waiting for late October for some relief from the heat.

Happy stamping...


Friday, July 20, 2018

Using Household Products to Make Cards - Part 2

Good Friday morning!  Happy to see you here.

I've been playing some more with other household products to make cards.   Here are some of the results.


The above card was made by pouncing cut up rubber bands into dye ink then pouncing on cardstock. 


This is a picture of the rubber bands that I cut up to do the previous card.  I secured a handful of the rubber bands with a rubber band to form a little handle.  I cut the other end off to make the pouncy things.  It was easier to just take a photo than try to describe it.  :-)

The next two cards use household bleach in two different ways.


For this card, I stamped the background onto white cardstock with a large background stamp in purple ink.  Then I sponged the same color ink on the background to cover the white. I stamped the flower image with Versamark ink and heat embossed it with black embossing powder.  Then I brought out the household bleach.  I bleached the flower and leaves.  I wanted a little contrasting color, so I colored the leaves back in with an alcohol marker. I like how it didn't totally remove the background stamping.  I think it gives the flower some texture.


This one was stamped on yellow cardstock and heat embossed with black embossing powder.  I used the household bleach to remove the color from the yellow cardstock flower.  I used alcohol markers to add a little bit of color back to the flower and to the leaves. 

So, these are a few more ways you can use household products in your stamping. 

My daughter sells Thirty-One, so we are going to a Christmas in July event tomorrow in Riverview Park (outside).  It's brutally hot here, so I hope we don't melt.  If you are local, stop by and say hello.

Hope you have a great weekend.

Inky hugs,


Thursday, July 12, 2018

Using Household Products To Make Cards

Good afternoon.  Spent last week visiting my sister in Georgia, and had a great time. I took my youngest granddaughter, Emilie, and we had a blast.  Her first time in the mountains.

I belong to an online group of international ladies, and every couple of months they have a challenge where we do different things.  A couple of months ago it was faux postage.  The challenge this time around is to use something on your card, either to make it or to embellish it, that's not normally found in the craft room.

So far I have come up with three cards. 

Table Salt

This card was watercolored with pink, green and blue, and while still wet I added table salt. The salt wicks the color, and when it dries you have these lovely patterns of texture. The salt easily brushes off.

Coffee

For this card I saved leftover coffee every day for about a week.  You don't need much each day.  I put it in a little plastic pallette and let the water evaporate.  Then I would add more the next day and let it evaporate.  When the water evaporates, you are left with a rich brown color.  When you are ready to color your image, just add a little water back to the well and paint away.  By varying the amount of water you use, you can get some really pretty tones.  Let each layer dry and add more color to intensify the colors.  I stamped the image in the lightest brown I had, and the lids and sentiment were stamped with a dark brown.  Other than that, the card was watercolored with coffee.

Dish detergent and food coloring

For this card, I mixed food coloring and water (you could also use dye reinkers) in a small cotainer that would allow me to dip the cardstock.  Then I added a little dishwashing soap and blew bubbles with a straw.  I took the cardstock and laid it on top of the bubbles (it's heavier and wants to sink, so hold on to it - you don't want the cardstock soaked, just laid on the popped bubbles). When the bubbles pop you are left with a nice background.  You have to do each color separately, but it's well worth it.  Vary the amount of food coloring you use to vary the intensity.

I have other ideas, but haven't had time to work on them yet.

Please leave a comment and tell me what is the most unusual thing you have used to make a card?  

See you soon.


Monday, June 18, 2018

Hero Arts Seas The Day

Good afternoon.  Hot and sunny here.  Summer has definitely arrived.

My friend was supposed to order the Hero Arts My Monthly Hero kit for me, but due to some miscommunication, I don't have it. And probably won't be able to get it.  Meanwhile, I liked the add on stamp set Seas The Day, so I ordered it.  Needless to say, it came Saturday and I had to make a few cards.  It's a bummer that I didn't get the full kit, though.  I really liked it.

Anyway, no use crying over spilled milk. 

Here is the first card I made:


These little seagulls are so delightful.  The first card up is a shaker card.  I added some die cut coral/seagrass. The background water/sky is sponged.  I colored the fish and the seagull with alcohol markers. I really liked the way it turned out.

Next up, 


I colored this card with colored pencils.  I cut an anchor with the Scan N Cut and you can't see it here, but I added Smooch inks gold.

This set was so much fun to play with.  I look forward to making a lot more cards.  :-)

#HeroArts 
#SeasTheDay

Keep crafting!


Thursday, March 1, 2018

Wedding and Retirement Cards

Wow!  It's been awhile since I got to post here.  I've been extremely busy, but having fun along the way.  Hubby got bit by a spider, and since we do not have any health insurance (unaffordable), I was forced to become a doctor/surgeon.  I was really worried about his toe, but it's on the mend and almost all better now.  It has been a long time since I was Dr. Mom, but I still have it.  :-)

I was recently asked to make a retirement card and a wedding card.  Now, I don't make a lot of these type cards, so I was kind of at a loss.  The wedding card was to be whimsical, so that took a little bit of the pressure off.  I'll share what I came up with.


I recently got this House Mouse stamp, and by adding a hat to the mouse on the right, I was able to turn it into a groom helping his bride to get ready for their wedding.  I think I might need to add a veil or something to the bride.  I'll figure it out.  There is glitter around the edge of the card.


Then I remembered I had the HalfPint Hero and Heroine stamps sets (Gina K. Design), and decided I could put the bride and groom in a car.  Perhaps honeymoon bound?  I wanted it to be bright and cheery.  I think I achieved that.

On to the retirement card.  I love this Stampin' Up set called Sitting Here.  It's available here. What better way to start retirement than to be able to relax on the swing with nothing to do?  That would surely be heaven to me.


I made a few more cards that would be appropriate for retirement, so my friend will have to choose.

Happy to share my creations.  Till next time....

Do something crafty.


Thursday, January 11, 2018

Kindness and Challenges

Good afternoon!

I recently entered a couple of challenges.  The first was to use only kraft, black and white colors, and the other was to make a card having to do with kindness.  I am about to share my cards.  :-)

First up we have Kindness cards:

I love the bright colors.  The letters are die cut and glitter applied.  The colorful background peeking out from behind the die cut front was made with Distress Oxide Inks.

I used an embossing folder and smooshed blue/gray ink on the debossed part. Then I applied Versamark to the raised parts and heat embossed with white ink.  I stamped the sentiment and die cut it then used die cut blue birds for a pop of color.


I love this die cut front, can you tell? I think it's a Tim Holtz die by Sizzix. There are 4 dies that cut out parts of the page. This is my favorite.  This card I entered in both challenges.  


Another card that fit both challenges.  The flower and sentiment are from the Daisy Delight Stampin' Up stamp set.  The patterned paper is Gina K. Designs.


Another card in kraft, black and white. The stamp set is a retired Stampin' Up set, but one of my favorites..

And my final card done in kraft, black and white.  I used the Nuvo Crystal Dew drops to make little "water droplets" on the card front.

Hope you have enjoyed my cards.


Christmas cards

Wow, I didn't realize it had been so long since I posted.  But I've been a busy bee.  I made 150 cards, which I sent to Ronald McDonald House, and then there was Christmas and all the shopping and family time.  And at work I had year end and getting things ready for the accountant.  But I'm back now and hope to post a little more often.

I did want to share with you my Christmas card this year.  If you remember, last year I made a card featuring 3 French hens:


This year I made 4 calling birds.  I only made about 20 of these for special friends.


I'll be back later with some more cards....

Inky hugs,